How to Repair Your Car’s Cabin Air Filter Without a Mechanic. Your car’s cabin air filter may not be a glamorous component under the hood, but it’s an imprtant piece of the puzzle that keeps your vehicle’s cabin air clean. Over time, this filter accumulates dust, pollen, pollutants, and debris — and whether it becomes clogged or damaged, it will affect your air quality, restrict air flow, and even put pressure on your vehicle’s HVAC system.
The good news is that repairing or replacing your cabin air filter does not require a mechanic. Most car owners can handle this task in their own garage in under 30 minutes with standard tools or even no tools at all. In this guide will show you how to inspect, clean, repair, or replace your cabin air filter like a pro – without the cost of a mechanic.
What Is a Cabin Air Filter and Why Does It Matter?
The cabin air filter is a crucial element of your car’s ventilation system. It filters the air entering the cabin from the outside, trapping dust, allergens, polltion, leaves, and even small bugs. A clean cabin air filter will ensure:
- Fresh, clean air inside the vehicle
- Proper airflow from your heating and AC vents
- Reduced odors and allergens
- Less strain on your blower motor and HVAC components
If the filter is dirty or damaged, you might notice stale air, weak airflow, foggy windows, or unpleasant smells when you turn on the air conditioning or heater.
Signs Your Cabin Air Filter Needs Repair or Replacement
Here are some common signs that your cabin air filter may need attntion:
- Weak or reduced airflow from air vents
- Musty or dusty smell inside the cabin
- More frequent sneezing or allergy symptoms while driving
- Noisy or strained blower fan
- Foggy windows that take longer to clear
- Visible dirt or debris when you inspect the filter
Some vehicles recommend replacing the cabin filter every 12,000 to 15,000 miles, while others suggest doing it once a year, espcially in areas with high pollution or dust.
Step 1: Locate the Cabin Air Filter

Before you can inspect or repair the filter, you’ll need to locate it. Cabin air filters are typically found in one of three places:
- Behind the glove box – This is the most common location in modern vehicles.
- Under the dashboard – Sometimes near the passenger footwell.
- Under the hood – Near the windshield or air intake area.
If you’re unsure where yours is, check your vehicle’s owner’s manual or search online using your car’s make and model.
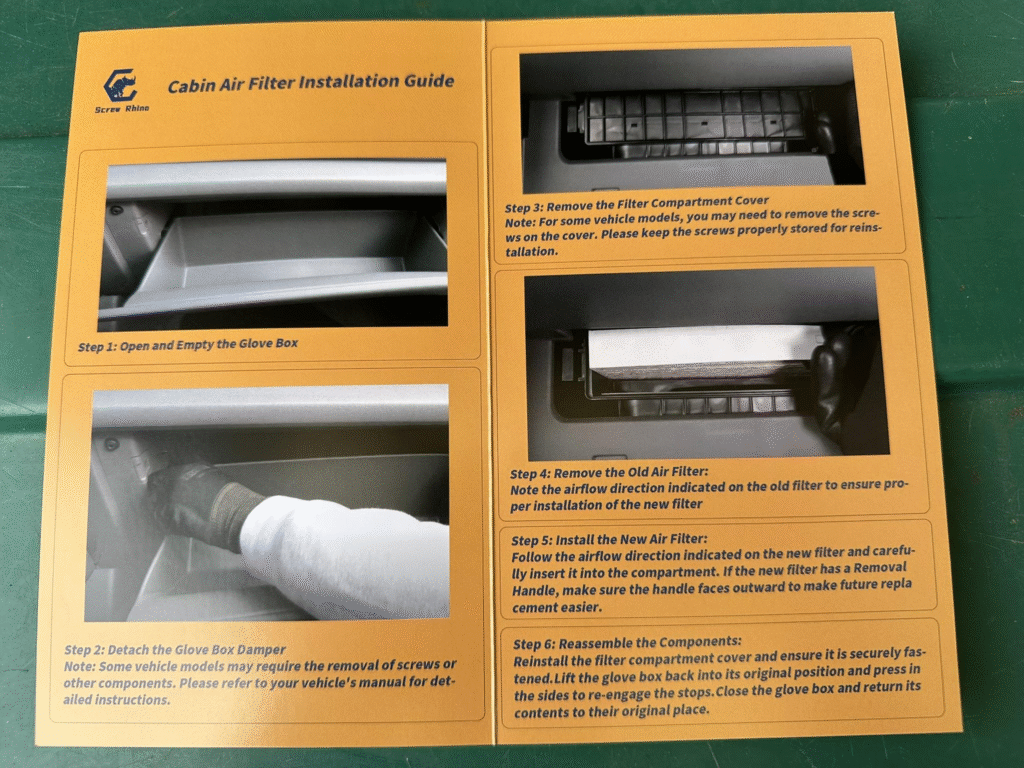
Step 2: Remove the Cabin Air Filter

Once you’ve found the filter housing, follow these steps to remove it:
- If the filter is behind the glove box, you may need to open the glove box fully and disconnect the side stops so it swings down.
- Locate the access panel or clips covering the filter compartment.
- Open the panel and slide out the old cabin air filter carefully.
- Note the direction of the airflow arrows printed on the filter. You’ll need this info when reinstalling or replacing it.
Be gentle when removing the filter, especially if it’s full of dust or debris.
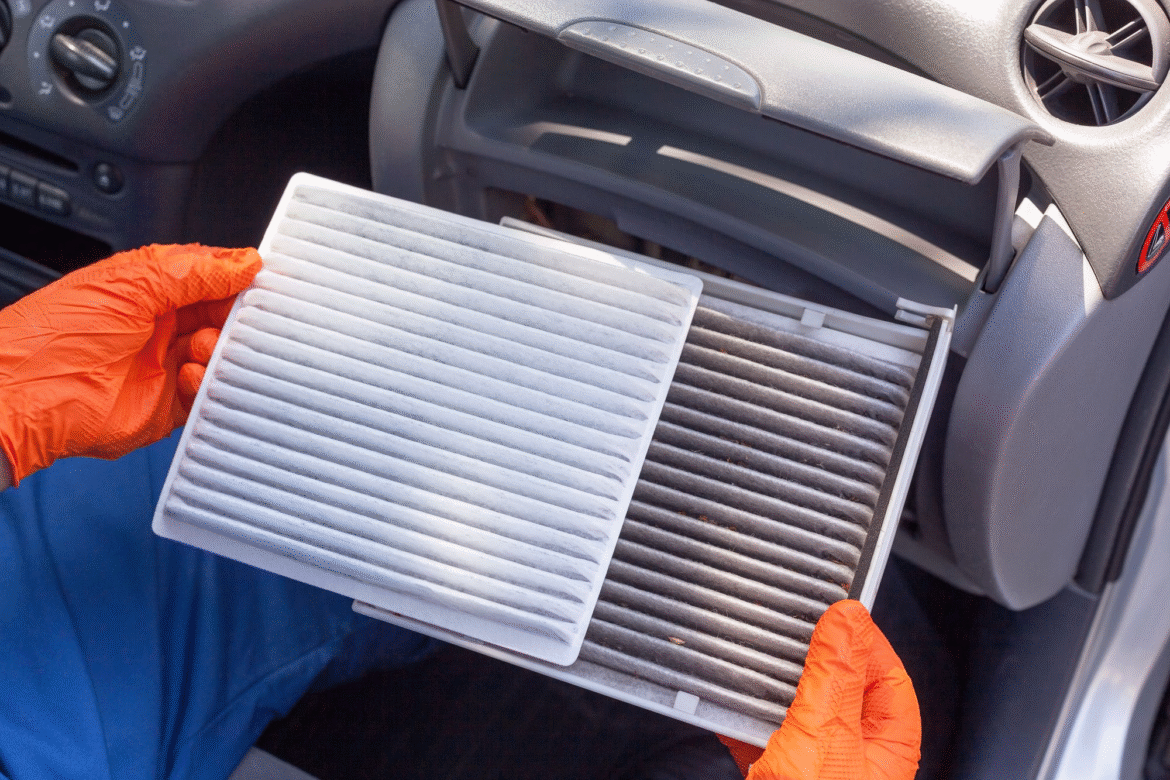
Step 3: Inspect the Filter for Damage or Clogging

With the cabin air filter removed, inspect it thoroughly.
- Hold it up to a light. If you can barely see light passing through, it’s likely clogged.
- Check for signs of mold, mildew, dampness, or foul odors.
- Look for tears, holes, or warped sections of the filter frame or paper material.
If the filter is only slightly dusty but still structurally sound, you might be able to clean and reuse it. If it’s torn or water-damaged, it’s best to replace it.
Step 4: Clean and Repair a Lightly Dirty Cabin Filter

If your cabin filter is not damaged but just dusty or mildly clogged, you can clean it using the following steps:
- Tap the filter gently to remove loose debris like leaves and dirt.
- Use a handheld vacuum cleaner or compressed air (blow from the clean side out) to remove fine dust and particles.
- If the filter is made of reusable foam or mesh, you can wash it gently with water and mild soap. Let it air dry completely before reinstalling.
- Inspect the rubber seal around the filter frame. If it’s loose or cracked, you can repair it using a thin strip of weather-stripping or foam tape.
Do not use harsh cleaners, bleach, or solvents, as these can damage the filter material and reduce its effectiveness.
Step 5: Reinstall or Replace the Cabin Air Filter

Once your filter is clean or you’ve purchased a replacement, it’s time to reinstall it.
- Slide the filter back into the housing, making sure the airflow arrows match the direction printed on the housing.
- Secure the access panel or clips.
- If you removed the glove box, reconnect the side stops or slow-down arm.
- Turn on your air conditioning or heater and test the airflow.
You should notice an immediate improvement in airflow and smell if the filter was dirty or clogged before.
When to Replace Instead of Repair
There are times when repairing or cleaning a cabin air filter just won’t cut it. Replace your cabin air filter if:
- It has tears, holes, or missing pieces
- It’s been exposed to moisture and has mold or mildew
- You’ve cleaned it multiple times and still notice weak airflow
- You drive in a heavily polluted, dusty, or pollen-heavy environment
Your vehicle’s cabin air filter is an important part of the vehicle’s ventilation system. It filters air from outside into the cabin, removes dust and allergens from the air, and reduces pollution and leaves. It will even filter some small insects. With a clean cabin air filter, you can expect:
Optional: Upgrade to a Better Filter
If you suffer from allergies or often drive in urban areas with high pollution, consider upgrading to a better-quality filter:
- Carbon filters – Help absorb odors and chemical fumes.
- HEPA filters – Remove up to 99.97% of allergens and fine particles.
- Antibacterial filters – Help prevent mold and bacterial growth inside your HVAC system.
These upgrades are often worth the small extra cost for better health and comfort inside your vehicle.
Tips for Maintaining a Clean Cabin Filter
Now that you’ve repaired or replaced your cabin filter, here are some maintenance tips to keep it working at its best:
- Inspect the filter every 6 months, especially if you live in a dusty or humid region.
- Avoid driving with the windows down on dirt roads or in high pollen seasons.
- Use the car’s recirculate air function during heavy traffic to reduce outside pollutants.
- Don’t ignore strange smells coming from your air vents — it could be a sign the filter needs attention.
- Clean the area around the air intake under the windshield (leaves and debris here can clog your filter faster).
Conclusion
Fixing or replacing your car’s cabin air filter does not need a mechanic, special tools, or even prior experience. With a little time and care, you can restore airflow, improve your in-cabin air quality, and even make your HVAC system last longer – all done from your own garage or driveway.
Unlike your engine air filter, the cabin air filter will require a little less attention to maintain a good relationship with your car, yourself, and your environment. A little basic attention and care, while not only making your drive feel good, is also a contributor to your overall health and peace of mind. So next time your vents feel weak, or you smell something funky when you first hit the AC, don’t ignore it, get in there like a boss and change that cabin air filter yourself!


